
What is Feedburner?
Feedburner is a Google service for bloggers or anyone who publishes content online. Feedburner delivers your new posts and updates to your subscribers via email or via Google Reader (or other readers). Feedburner provides another way to share your content with your community.
What is an RSS feed?
RSS stands for Really Simple Syndication. RSS is a way to let your subscribers know that you have fresh content on your blog.RSS feeds can be emailed to your subscribers or delivered to their readers. That way they can enjoy your content their way and in their time. Here’s a great explanation of how RSS feeds work.
How do I burn a feed?
(NOTE: This post was first published on the Go WordPress blog. The feed example for this post related to burning a feed for Go WordPress)
First you need a Google account. Once you’ve logged in, go to Google Feedburner. At the welcome page, you’ll be invited to burn a feed.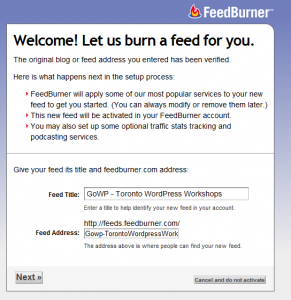
- Begin by selecting your Feed’s Title. We chose GoWP – Toronto WordPress Workshops for our Feed Title.
- Enter your blog’s address and add the extension /feed -> so that your URL looks like this: http://yourdomain.com/feed
- You claim your feed by clicking the Next button at the bottom left of the welcome page.
- You’ll be congratulated for successfully burning a feed and you should see the address of your feed.
- Next, you be invited to Optimize (enhance Feedburner services), Publicize, Monetize and Troubleshootize.
- In the Optimize tab, in the sidebar, make sure that there is a checkmark beside the BrowserFriendly option (ensures readability across all browsers). If it isn’t ticked, click on it and then enable the browser friendly option.
- In Optimize we also recommend that you subscribe to Smartfeed. Smartfeed consolidates your subscription links into one feed that works in any reader, on the desktop, web, mobile devices and beyond. In the left-hand sidebar, click on Smartfeed. And on the page, click to enable Smartfeed.
- You can explore monetize, publicize and troubleshootize. These are extra features that you can choose to enable but are not necessary for a successful feed.
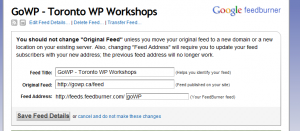
- To verify all your feed details, look below your Feed title and click on edit feed details. This is what you should see:
- Now add a widget to your website (you have a few options). You can have an RSS icon linked from a social media widget. You could have a follow button for Feedburner or you could use the Feedburner
- Into one of these options you should insert feeds: feeds.feedburner.com/goWP. Replace goWP with your Feed name.
Now it’s your turn to burn your feed. Questions or comments? Leave me a comment or question.
This post, originally posted on the Learn WordPress blog, has been lightly edited here.


This is a good tutorial for newbie bloggers looking for help to promote their blogs.